There are plenty of guides to using git all around the web. Why should I add another drop to a vast ocean of resources?
Well, as someone who’s professional experience with VCS has only involved Mercurial, I wanted to give myself a deeper understand of a tool I was going to be using daily. Furthermore, research shows that teaching others improves one’s understanding of the taught material.
When I was offered the chance to give a presentation on git at work, I took it to build my own understanding, and, hopefully, my colleagues’ as well. While this won’t be the most comprehensive guide on git, I wanted to highlight my learnings to myself and to you, dear reader.
This guide will assume you have basic understandings of why developers use
git, though will still dive into "basic" topics that I find interesting from a technical or usability standpoint.
Common Workflows
Most developers use a single, centralized repository that all individuals push and pull from. But aside from that, there’s rarely a “one size fits all” solution to git. Here are some basic approaches that I found in my research:
Gitflow
The Gitflow approach was pioneered in 2010 by Vincent Driessen at nvie and has wormed its way into enterprise software globally. The idea revolves around two core branches in your repo: main (or master) and some development branch.
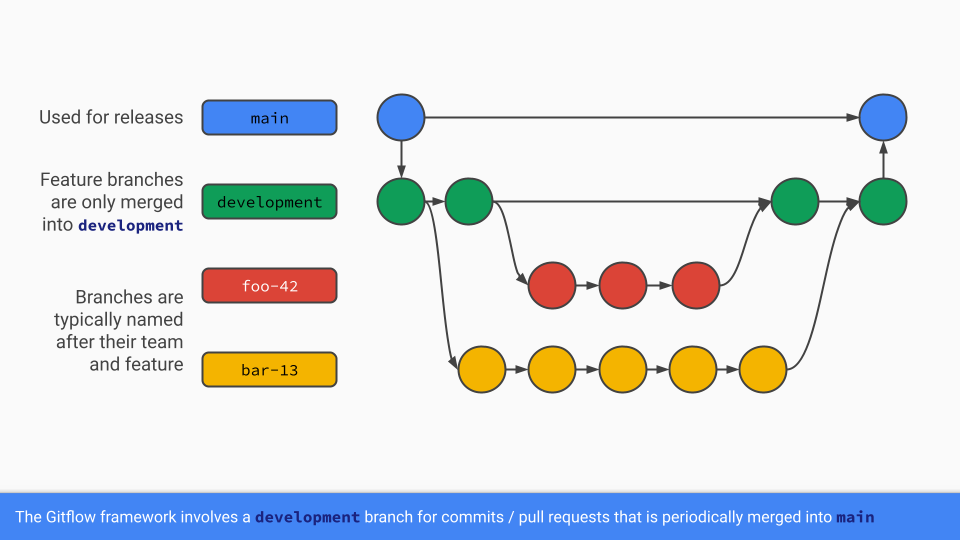
The development branch is where all branches diverge from and are eventually re-merged. Then, whenever a new version of the software should be cut, the development branch is merged into main.
Effectively, main is only ever touched by development. This prevents any incomplete code from being checked into main and makes the commit history (ideally) easier to parse, since each commit represents a new version of the product.
As mentioned in Driessen’s 2020 reflection about Gitflow, in the 10 years since, most software is continuously released, rather than released version-by-version. Subsequently, a simpler workflow can accomplish the same result.
Feature Branches (Preferred)
Feature branches are, for the most part, identical to the Gitflow approach, with one major difference: There isn’t a development branch. By gating merge commits to main with tests, developers can prevent broken code from ever making it into main, which is a huge advantage for continuous integration and deployment environments.
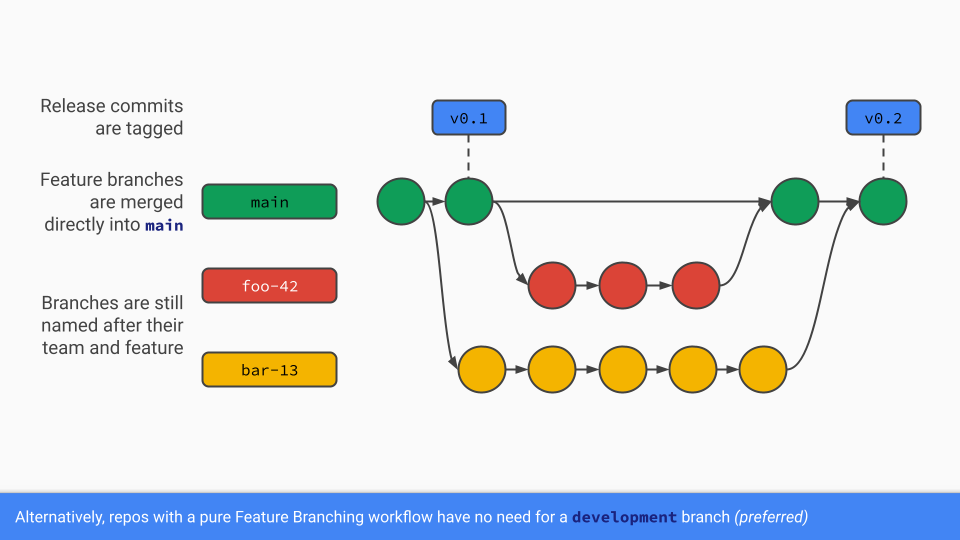
Rather than merging from development into main whenever a release is necessary, commits in main can be tagged as a release. This still provides the rigid versioning structure necessary for some releases without requiring the overhead of additional branches and special rules.
Forking
The forking approach breaks the single-remote mold. Each developer has their own remote that they are able to write to at their leisure (even pushing to main!) This is often used for free and open-source (FOSS) projects, so that the maintainer doesn’t need to meddle around with permissions for contributers.
To understand forking, it’s first important to understand how remotes work. This was something I learned while researching this presentation:
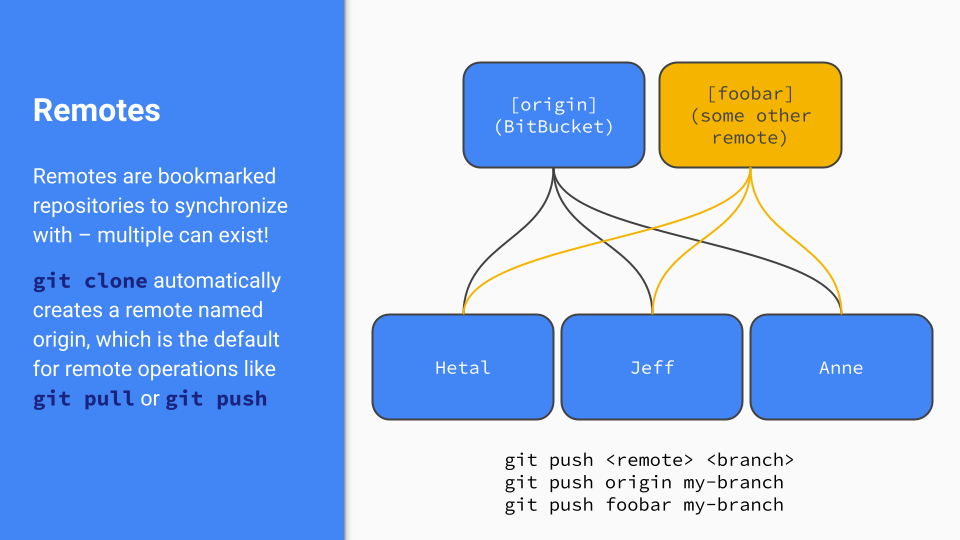
Remotes are, true to their name, remote repositories to synchronize your changes with. While most developers use only one, typically hosted on something like GitHub or BitBucket, multiple remotes can split the management of a codebase more than just a branch can — by allowing completely different commit trees entirely!
With the forking workflow, developers create their own copy of the source repo to work in. They can always pull in changes from the source repo to their own copy, that way they’ll stay in sync with new features.
When they’re ready to commit a change upstream, they make a pull request (PR) where they can discuss their changes before merging in. In most cases, the maintainer of the source repo is the only one with write access and is therefore the “keeper” of features making it into the mainline.
Other Important Concepts
There were a few other topics that I learned along my journey from a “how does git implement this” standpoint, even if I was already familiar with the terms and — in the case of branches, at least — how to use them.
Branches
These became a bit easier to visualize once I had a mappable concept in my head. Branches are nothing more than pointers to a specific hash in the commit tree. They move as you make commits, but they aren’t doing anything special, they just mark your progress.
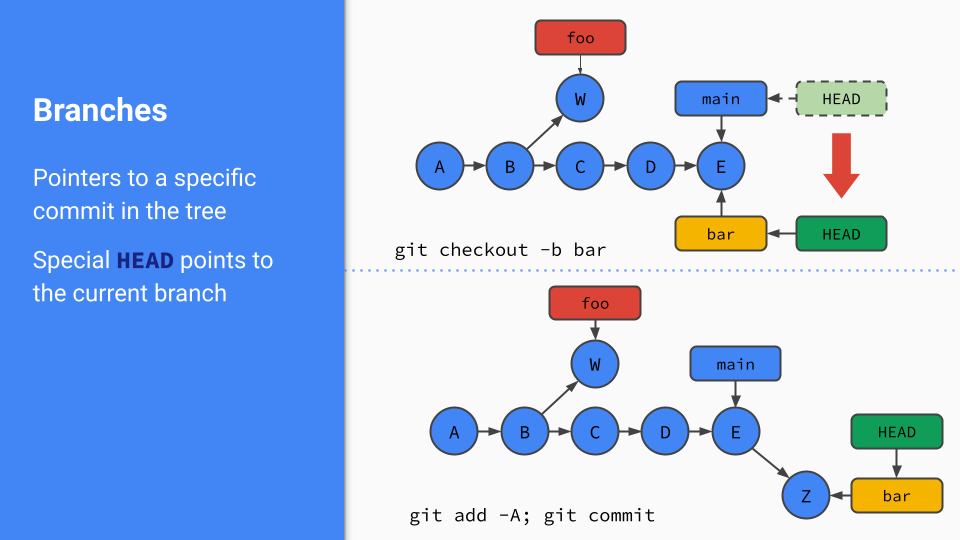
In the above diagram, we can see a foo branch based on commit B and then with some work in W added on top of it. When we create a new branch from main, (also located at HEAD, our currently checked-out branch) we are instantiating a new pointer to the same commit, and moving HEAD to show we’ve checked it out.
Once we commit some more work to the bar branch, we can see a new node in the tree, and both bar and HEAD have advanced to this new point in history. In this way, branches “grow”, much like those on a tree.
It can also be useful to run git commands using HEAD. Appending ~<number> will run on a commit relative that number to HEAD.
For example
git diff HEAD~1shows you the differences between your staged files and those already committed.
Merging
While merging is a common practice, how does it actually work inside of git? There are a few different types of merges, some simple, some more complex.
The first is a fast-forward merge. This is the simplest type of merge, since it happens when there is been no divergence between the two branches. If you attempted to merge the bar branch from the diagram above into main, the main pointer could just be shifted forward, since there hasn’t been any committed work to main.
A three-way merge is more complex. We can see an example of one in action below:
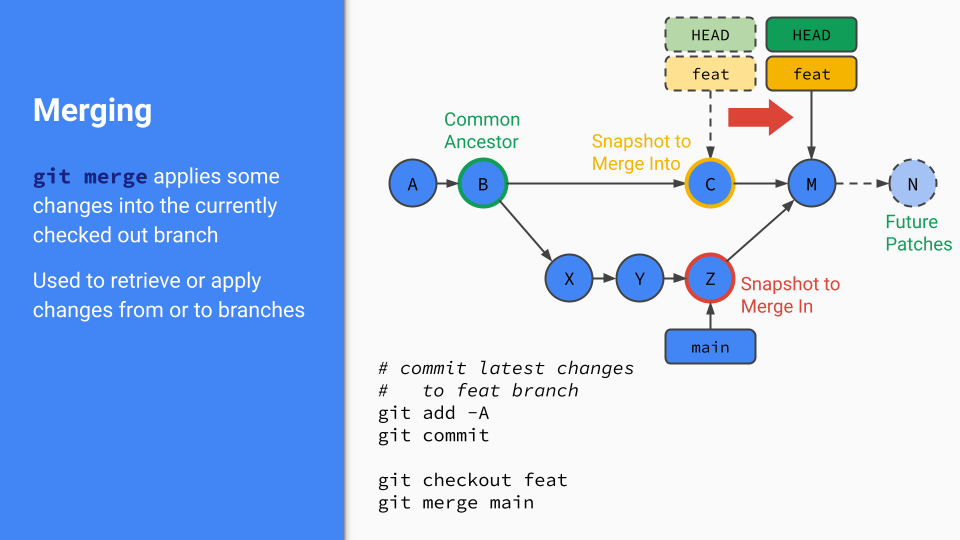
In this example, there has been some work committed to main while we have been working on feat. Since we want to pull in those changes while we keep working on feat, this is called “a merge of main into feat”.
Because the latest commit of the branch you’re on isn’t a direct ancestor of the branch you’re merging in, git has to do some work. In this case, it examines the latest snapshot of each branch tip (C and Z) and their common ancestor — where they diverged in the tree — B. git then tries to determine what’s actually changed using a variety of merge strategies.
In some cases, git can’t figure this out, and you have to resolve a merge conflict. But regardless, any changes to feat are stored in new merge commit on the branch (M). Future patches can still be applied onto feat, as seen by patch N.
It is also possible to apply work between branches using
git rebase, though its main benefit is creating a cleaner, more lineargithistory. In my experience, being proficient withgit mergewill get you by and is a great place to start.
Merge Commits
Once you decide to perform a merge, now you have a choice of how you’d like git to do it for you.
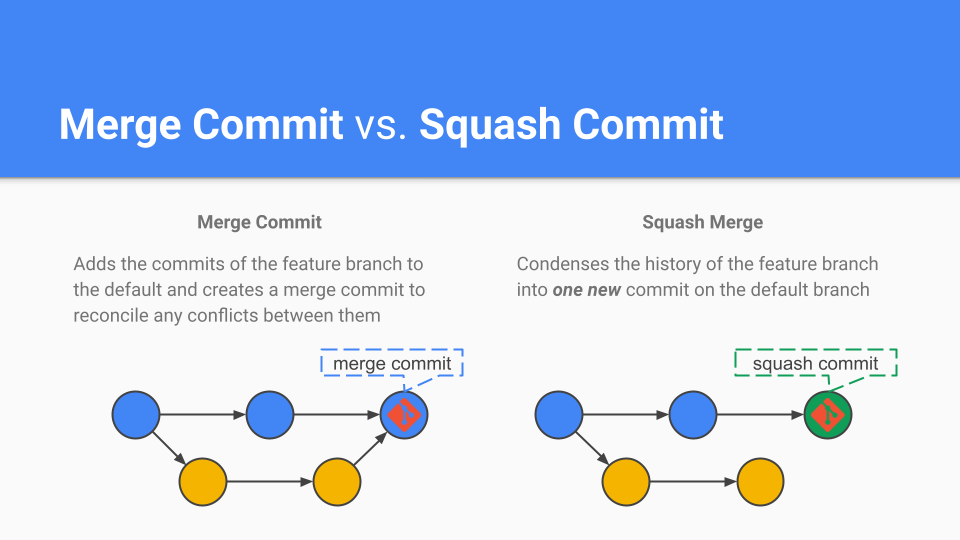
Merge commits provide granular, in-depth history, since they preserve the work from each commit in feat when joined into main. They are best used for bug-prone logic changes where bisecting commits can expedite detection.
Squash commits combine all of the work from feat into a single commit onto main. This means the history is much simpler — one big pile of changes — but can be harder to sift through. It’s best used for a series of like patches, such as style fixes or refactors.
Although there’s a big trade-off between each, I’ve heard Squashes favored more often than not. It may be that, like rebasing, a better git history is rarely appreciated. Though, when it’s needed, it can be nice to have done the work and made your life easier.
Final Thoughts
There’s still a lot more I have to learn with
git. Maybe another presentation and subsequent post are in order? All I know is that I look forward to deepening my knowledge ofgitas I use it more both professionally and personally.